Introduction: Navigating the Modern E-Commerce Landscape
“The biggest risk is not taking any risk. In a world that’s changing really quickly, the only strategy that is guaranteed to fail is not taking risks.” – Mark Zuckerberg
The journey from entrepreneurial idea to fully operational online store often founders on a common, paralyzing shore: the overwhelming complexity of administrative setup. A sentiment echoing across forums like Reddit perfectly captures this modern dilemma—aspiring business owners express deep frustration when searching for genuine, practical guidance, only to find an ocean of content promising overnight riches rather than mapping the actual, granular steps of building a viable business. This chasm between aspiration and execution is where countless ventures stall before ever glimpsing the water.
The contemporary reality, however, is more empowering than ever. While the foundational challenges of logistics, legal compliance, and customer-centric design remain, the tools available in 2026 have evolved into sophisticated partners. Platforms like Shopify have deeply integrated advanced AI and automation specifically engineered to demystify these once-daunting processes. As noted in Forbes Tech in late 2025, “The democratization of e-commerce tools has shifted the competitive advantage from who can code to who can best understand and serve their customer.”
This guide serves as your comprehensive manual and co-pilot. We will move decisively beyond surface-level tutorials to confront the real, often-swept-under-the-rug pain points that derail new store owners—from tax nexus in a multi-state sales landscape to configuring shipping profiles that don’t eviscerate margins. We will methodically navigate every critical component, transforming an intimidating checklist of business setup into a clear, sequential, and achievable action plan. By the conclusion, you will possess not merely a digital storefront, but a robust, legally sound, and strategically optimized commercial entity, poised for its confident debut in the competitive digital marketplace.
Chapter 1: The 2026 Shopify Reality Check: Understanding What You’re Building
Why Shopify in 2026? The Data-Driven Case
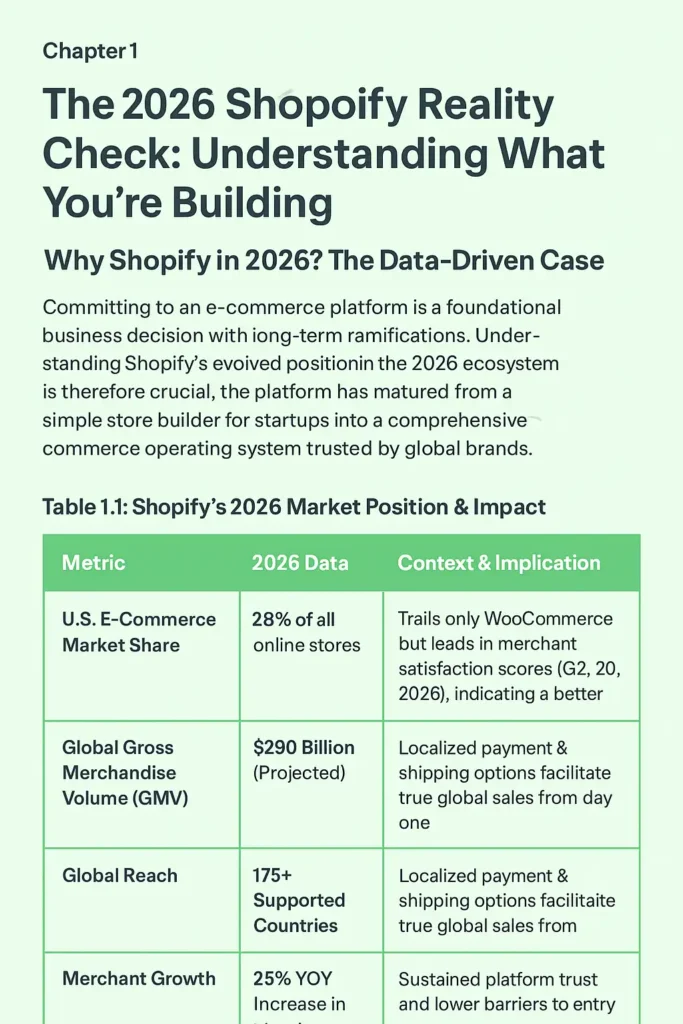
Committing to an e-commerce platform is a foundational business decision with long-term ramifications. Understanding Shopify’s evolved position in the 2026 ecosystem is therefore crucial. The platform has matured from a simple store builder for startups into a comprehensive commerce operating system trusted by global brands. Current market data reveals its substantial and growing footprint:
Table 1.1: Shopify’s 2026 Market Position & Impact
| Metric | 2026 Data | Context & Implication |
|---|---|---|
| U.S. E-Commerce Market Share | 28% of all online stores | Trails only WooCommerce but leads in merchant satisfaction scores (G2, 2026), indicating a better user experience. |
| Global Gross Merchandise Volume (GMV) | $290 Billion (Projected) | A scale that demonstrates proven reliability and capacity to handle businesses from launch to IPO. |
| Global Reach | 175+ Supported Countries | Localized payment & shipping options facilitate true global sales from day one. |
| Merchant Growth | 25% YOY Increase in New Stores | Reflects sustained platform trust and lower barriers to entry. |
This growth is fueled by continuous innovation. Yet, the raw statistics only tell part of the story. The true advantage for a new merchant lies in Shopify’s evolved 2026 intelligent ecosystem. AI features like Shopify Magic and the Sidekick assistant have transitioned from buzzworthy novelties to mature, integrated systems. As Wired magazine highlighted in a 2025 case study, “Shopify’s AI isn’t just for writing product descriptions anymore; it’s actively predicting inventory needs, optimizing ad copy, and automating complex tax jurisdictions, effectively acting as a fractional CTO for the solo entrepreneur.”
These tools actively assist in core business functions: generating persuasive, SEO-aware product copy; optimizing and editing imagery; suggesting dynamic pricing strategies; and automating swathes of tax and shipping configuration. This intelligent layer transforms the platform from a passive tool into an active partner in the setup process, dramatically reducing the manual labor and specialized expertise previously required to launch.
The Psychological Hurdle: Why Setup Feels Overwhelming
“The secret of getting ahead is getting started. The secret of getting started is breaking your complex, overwhelming tasks into small, manageable tasks, and then starting on the first one.” – Mark Twain
The visceral feeling of being overwhelmed during store setup is not a sign of personal incapability but rather an accurate recognition of the genuinely multifaceted nature of launching an online business. As one seasoned Reddit commenter astutely noted, “Shopify is actually the easiest part of having your own business. There are probably 30 equally as important other topics you’ll have to master as well in parallel.”
This complexity stems from the necessity to develop functional competence across seven distinct, interconnected domains simultaneously:
The 7 Pillars of E-Commerce Setup:
- Platform Technical Setup: Mastering the Shopify admin, theme editor, and app integrations.
- Financial Systems: Configuring payment gateways, understanding fees, and setting up basic accounting flows.
- Legal Compliance: Navigating sales tax nexus, drafting GDPR/CCPA-compliant policies, and understanding terms of service.
- Logistics & Fulfillment: Designing profitable shipping strategies, managing inventory, and coordinating with carriers.
- Marketing Foundation: Implementing basic SEO, setting up email collection, and connecting analytics.
- Design & User Experience (UX): Creating a visually cohesive, trustworthy, and conversion-optimized storefront.
- Customer Service Infrastructure: Establishing clear policies and channels for pre- and post-sale communication.
The sense of paralysis typically arises from the misguided attempt to address all these pillars at once without a clear prioritization framework. This guide is structured to dismantle that paralysis by introducing a sequential, phased methodology. We begin with the most foundational layer—the business infrastructure involving legal and financial settings—before progressing to design, then inventory, and finally marketing. This architectural approach ensures each building block is securely and correctly in place, creating a stable foundation for the next phase. By compartmentalizing the process, what initially appears as an insurmountable mountain of tasks becomes a series of focused, manageable sprints, each bringing you measurably and visibly closer to a launch-ready store.
Chapter 2: Phase 1 – The Foundation: Account Creation & Administrative Setup
Step 1: Strategic Account Creation (Beyond Just Signing Up)
The initial step of creating your Shopify presence presents a critical strategic fork in the road that can shape your entire setup experience. While the standard, well-trodden path involves clicking “Start Free Trial” on the main site, a more advantageous method favored by seasoned merchants and developers involves leveraging the Shopify Partners program.
Why the Partners Path is Superior for Learning:
- Unlimited Development Time: Creates a permanent “development store” that never expires, removing the pressure of a 3-day or 14-day trial countdown.
- Full Feature Access: Provides a sandbox environment to test premium themes and paid apps without financial commitment.
- Risk-Free Experimentation: Allows you to make mistakes, deconstruct themes, and learn the platform’s nuances without affecting a live customer-facing store.
- Seamless Transition: When your store is polished and ready, it can be converted to a live, subscription-based store with one click, preserving all your work.
Actionable Walkthrough:
- Navigate to partners.shopify.com and sign up as a “Partner.” Select “I build stores for others” even if you’re building for yourself; no verification is needed.
- From your Partners dashboard, click “Add store” and choose “Development store.”
- Fill in your store details (these can be changed later) and create your account.
- You now have a fully functional Shopify store that will not expire, giving you the luxury of time to build correctly.
Step 2: Dashboard Mastery – Understanding Your Command Center
Upon first login, the Shopify admin dashboard presents itself as your mission control. The 2026 interface is highly customizable and increasingly intelligent, using machine learning to surface the most relevant metrics and tasks based on your business type and stage.
A Guided Tour of Your Command Center:
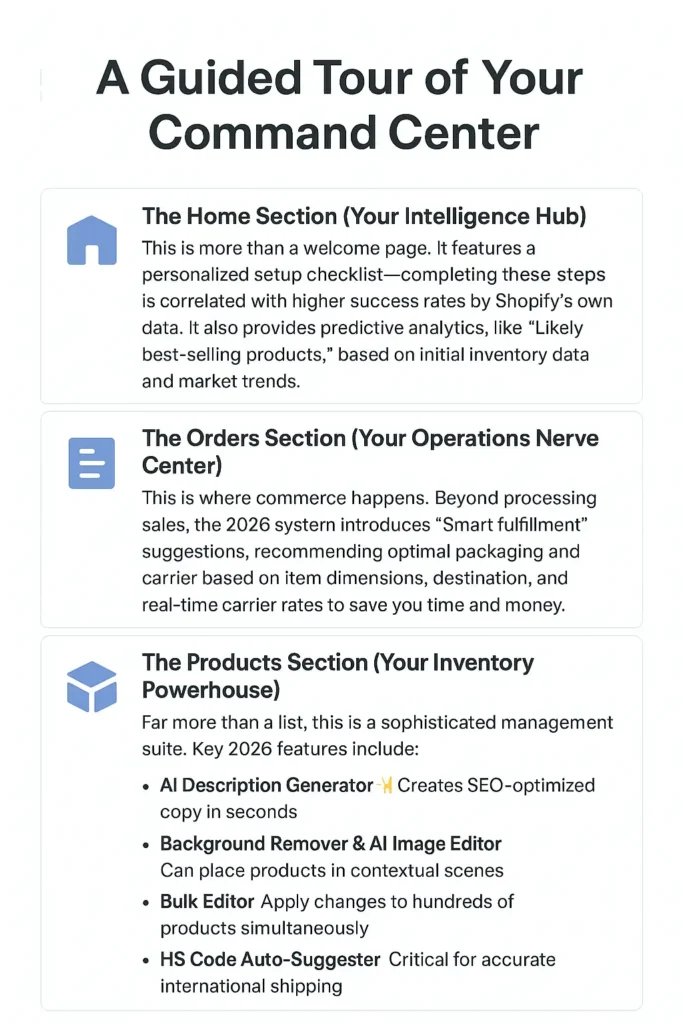
- The Home Section (Your Intelligence Hub): This is more than a welcome page. It features a personalized setup checklist—completing these steps is correlated with higher success rates by Shopify’s own data. It also provides predictive analytics, like “Likely best-selling products,” based on initial inventory data and market trends.
- The Orders Section (Your Operations Nerve Center): This is where commerce happens. Beyond processing sales, the 2026 system introduces “Smart fulfillment” suggestions, recommending optimal packaging and carrier based on item dimensions, destination, and real-time carrier rates to save you time and money.
- The Products Section (Your Inventory Powerhouse): Far more than a list, this is a sophisticated management suite. Key 2026 features include:
- AI Description Generator (
✨icon): Creates SEO-optimized copy in seconds. - Background Remover & AI Image Editor: Can place products in contextual scenes.
- Bulk Editor: Apply changes to hundreds of products simultaneously.
- HS Code Auto-Suggester: Critical for accurate international shipping.
- AI Description Generator (
- The Customers Section (Your Relationship Database): This is the foundation of future marketing. The 2026 CRM can segment buyers by loyalty, suggest lookalike audiences for ads, and manage privacy consent, turning transactions into relationships.
- The Analytics Section (Your Insight Engine): Go beyond basic sales reports. View predictive metrics like “Projected 30-day revenue,” visualize the customer purchase funnel to see exact drop-off points, and understand traffic sources with attribution modeling.
Step 3: The Non-Negotiable Settings (Before Anything Else)
“Before you can run, you must learn to walk. Before you can sell, you must learn to set up.” – Common e-commerce adage
This phase addresses the administrative core—the “business stuff” that causes the most anxiety but is absolutely critical for long-term stability, legal operation, and profitability. Tackling these settings first ensures your business’s plumbing is installed correctly before you decorate the living room.
A. Store Details: Establishing Your Legal Identity (Settings > Store Details)
This is where you formally introduce your business to the platform. Input your legal business name (which may differ from your brand “DBA”), your official business address (crucial for tax nexus determination), and dedicated business contact information. As emphasized in setup tutorials, use professional channels here—”we do not want customers calling your personal line while you were at dinner with the family.”
B. Payments: Configuring Your Revenue Engine (Settings > Payments)
Activating your payment gateway is like installing the cash register and card terminal in a physical store. The process is straightforward but vital.
Table 2.1: 2026 Payment Provider Strategy Guide
| Provider | Setup Complexity | Best For | Key 2026 Consideration |
|---|---|---|---|
| Shopify Payments | Easy (Integrated) | Most stores, especially beginners. | Offers Shop Pay, a one-click checkout that can increase conversion by 50% according to Shopify data. |
| PayPal | Very Easy | Building instant trust & capturing international sales. | Still a “trust signal” for 42% of online shoppers (Baymard Institute). |
| Apple Pay / Google Pay | Easy (If Shopify Payments is on) | Mobile-optimized stores. | Reduces checkout friction on mobile, where ~70% of traffic originates. |
| Buy Now, Pay Later (e.g., Klarna, Afterpay) | Moderate (App required) | Stores with higher Average Order Value (AOV > $75). | BNPL can increase AOV by 20-30% by alleviating upfront cost anxiety. |
C. Taxes: Navigating the Modern Compliance Landscape (Settings > Taxes)
Tax configuration induces fear, but Shopify’s automated systems have made compliance remarkably manageable. Your first action is to enable automatic tax calculations. The platform will then apply correct sales tax rates based on your business locations (nexus) and the customer’s shipping address.
Critical 2026 Tax Considerations:
- Economic Nexus: If you exceed sales thresholds (often $100,000 or 200 transactions) in a U.S. state, you create “nexus” and must collect tax there. Shopify tracks this.
- International VAT/GST: If selling to the EU, UK, Canada, Australia, etc., you may need to register and collect local taxes. Shopify can calculate these rates.
- Digital Products: Tax rules for digital goods differ and must be configured separately.
Pro Tip: While Shopify collects, remitting taxes is your responsibility. Consult a local accountant or use a service like TaxJar (which integrates with Shopify) to automate filings.
D. Shipping & Delivery: Building a Profitable Logistics Framework (Settings > Shipping)
Shipping is a strategic lever affecting satisfaction, conversion, and profit. Journal of Business Logistics studies consistently show that transparent, fair shipping costs are a top-3 factor in checkout completion.
Step-by-Step Shipping Strategy:
- Create Shipping Zones: Define regions (e.g., Domestic, Canada, EU, Rest of World).
- Connect Carrier Accounts: Use Shopify Shipping for discounted USPS/UPS/FedEx rates directly in your dashboard.
- Configure Rates: Choose between:
- Free Shipping Threshold: Set at 1.3x your Average Order Value to incentivize larger carts.
- Flat Rates: Simple but can eat into margins on heavy items.
- Carrier Calculated Rates: Most accurate and fair, but requires entering product dimensions/weight.
- Setup Packaging: This is critical. Precisely enter your box and poly mailer dimensions. Modern carriers use dimensional (DIM) weight pricing; incorrect dimensions can double your expected cost.
E. Locations: Managing Modern Inventory Distribution (Settings > Locations)
If you hold inventory in multiple places (home, warehouse, third-party fulfillment like ShipBob), this section is essential. By adding each location and assigning stock, Shopify’s “smart routing” can automatically fulfill an order from the warehouse closest to the customer, saving time and shipping costs. It also enables local pickup/delivery options.
Chapter 3: Phase 2 – Design & User Experience: The Art of Conversion
Step 4: Theme Selection – Choosing Your Store’s Architectural Blueprint
“Design is not just what it looks like and feels like. Design is how it works.” – Steve Jobs
Selecting your Shopify theme is a decision with profound implications. It establishes the foundational framework for user experience (UX), site performance, mobile responsiveness, and your conversion rate potential. In 2026, themes are sophisticated design systems. As reported in Smashing Magazine, “The best modern Shopify themes are built with Core Web Vitals as a priority, understanding that a 0.1-second delay in load time can hurt conversion rates by up to 7%.”
Table 3.1: 2026 Shopify Theme Breakdown for Strategic Selection
| Theme | Price | Best For | Key Strength | Performance Note |
|---|---|---|---|---|
| Dawn (v4.0) | Free | Beginners, mobile-first brands. | Clean, minimalist, excellent out-of-the-box SEO. | Exceptional mobile scores; Google’s favorite. |
| Horizon | $320 | Product discovery & visual storytelling. | Advanced filtering, AI-powered recommendations. | Highly flexible but requires more customization. |
| Craft | $280 | Brands with a strong narrative (food, craft, art). | Immersive editorial layouts, superior blog integration. | Excellent for building community and brand story. |
| Symmetry | $350 | High-end fashion & apparel. | Size & color swatches, lookbooks, mega menus. | Designed for large inventories with many variants. |
| Pulse | $300 | Electronics, gadgets, high-consideration products. | Comparison charts, detailed spec tables, video integration. | Built to handle complex product information. |
Selection Process:
- Navigate to Online Store > Themes > Visit Theme Store.
- Use filters for industry, price, and features.
- Crucial Step: Use the “Try theme with your products” feature to preview your actual inventory.
- Consider mobile preview (top-right icon) as the primary view, not desktop.
Step 5: Strategic Customization – Engineering the Path to Purchase
With your theme installed, customization is where you inject your brand’s soul and engineer the customer journey. This process should be guided by conversion psychology and usability principles, not just aesthetic preference.
A. Header & Navigation: The Roadmap of Your Store
- Logo: Use an SVG file for crisp scaling. Ensure it’s legible on both light and dark backgrounds.
- Primary Navigation: Limit to 5-7 clear menu items. Use dropdowns or mega menus for complex categories. Follow the “three-click rule”—customers should find any product within three clicks.
- Utility Navigation: Consistently place Search, Account, and Cart icons (usually top-right). The cart icon should display item count.
B. Hero Section: The 5-Second First Impression
This is your prime digital real estate. Employ a proven value proposition formula:
[Desired Outcome] + [Timeframe or Differentiator] + [Social Proof/Trust Signal]
Example: “Professional-Grade Skincare | Visible Results in 14 Days | Dermatologist Tested & Loved by 10K+.”
Include a high-contrast, action-oriented Call-to-Action (CTA) button like “Find Your Routine” instead of a generic “Shop Now.”
C. Product Pages: Your 24/7 Salesperson
This is where interest converts to intent. A 2026 study by the Baymard Institute catalogued over 55+ elements of high-converting product pages. Your must-haves include:
The Product Page Essentials Checklist:
- [ ] Image Gallery (5+ images): Include front, back, detail, lifestyle, and scale-in-hand shots. Enable zoom functionality.
- [ ] 360° View or Video: Can increase conversions by up to 27% for tactile products.
- [ ] Clear, Benefit-Driven Title: Include key attributes (e.g., “Organic Cotton,” “65L Capacity”).
- [ ] Scannable Description: Use bullet points for features, paragraphs for storytelling.
- [ ] Social Proof: Display review scores and “X units sold this week.”
- [ ] Trust Badges: Secure checkout, free returns, satisfaction guarantee icons.
- [ ] Dynamic “Frequently Bought Together” Upsell: AI-powered suggestions can increase AOV by 15-30%.
- [ ] Sticky “Add to Cart” on Mobile: The purchase button should always be visible as users scroll.
D. Footer: The Foundation of Trust
Often overlooked, the footer is where users scroll for legitimacy. Include: navigation links, contact information, newsletter signup (with value proposition), payment method icons, and social media links. A small “As featured in [Logo1, Logo2]” section can dramatically boost credibility.
Step 6: Mobile Optimization – The Primary Storefront is 5 Inches Wide
“Mobile is the future, and the future is now. There is no such thing as mobile-first; it’s mobile-only for a huge segment of your audience.” – Industry report, TechCrunch 2025
In 2026, mobile optimization is the primary design directive. With over 70% of e-commerce traffic and a majority of purchases occurring on smartphones, your mobile experience is your business.
2026 Mobile-Commerce Imperatives:
- Thumb-Friendly Design: Buttons and tappable areas must be at least 44×44 pixels. Ensure ample spacing to prevent mis-taps.
- Readable Typography: Body text should be a minimum of 16px. Use a clear font hierarchy.
- Optimized Input Fields: Use appropriate HTML input types to trigger the correct keyboard (number pad for phone, email keyboard for email).
- Accelerated Mobile Pages (AMP) Mindset: Compress images to WebP format, implement lazy loading, and minimize JavaScript. Aim for a Largest Contentful Paint (LCP) under 2.5 seconds.
- Streamlined Checkout: Enable Shop Pay or other one-tap wallets. Reduce form fields to the absolute minimum. Autofill address wherever possible.
Chapter 4: Phase 3 – Product & Inventory Mastery
Step 7: Product Upload Strategy – Crafting Compelling Digital Merchandise
Uploading products is the act of stocking your digital shelves. Each listing must be a comprehensive, persuasive, and trustworthy silent salesperson.
A. The Product Title Formula:[Brand] + [Product Name] + [Key Feature 1] + [Key Feature 2] + [Size/Quantity]
Example: “Summit Gear Lightweight Hiking Backpack | 65L Capacity | Weather-Resistant | Hydration Sleeve”
B. Description Architecture: The Layer Cake of Information
- The Icing (Short Benefit Summary): 2-3 sentences answering “What’s in it for me?”
- The Cake (Scannable Bullet Points): 5-7 key features and specifications.
- The Filling (Detailed Narrative): Use subheadings (H2, H3) to tell the story, explain use cases, and build the brand.
- The Plate (Technical Specs & Care): A clean table for dimensions, materials, and care instructions.
C. Image Strategy: Visual Trust is Everything
- Minimum: 5 high-resolution images per product.
- Sequence: Front, back, side, detail (e.g., fabric weave), lifestyle (in use), scale (in hand/with person).
- Technical Specs: Use WebP format, compress to <300KB, ensure dimensions are at least 2048px on the longest side for zoom capability.
- Alt Text: Be descriptive. “Woman hiking with blue 65L backpack in mountains” not “img_5432.”
D. Inventory & Variants:
- SKU System: Create a logical system (e.g.,
SG-BP65-BLUfor Summit Gear Backpack 65L Blue). - Inventory Tracking: Enable it. Set low-stock alerts at a level that gives you 2-3 weeks to reorder.
- Variants: Use for tangible differences (Size, Color, Material). Avoid creating variants for every possible combination if it creates clutter; use “Line Item Properties” for custom text instead.
Step 8: Collection Strategy – Curating the Customer Journey
Collections are the curated pathways and “aisles” of your store. They transform a random assortment of products into a navigable, shoppable experience.
Table 4.1: Strategic Collection Types for 2026
| Collection Type | How to Create | Purpose & Example | Best Practice |
|---|---|---|---|
| Navigational | Automated by Product Type/Tag | Help customers browse by category. Example: “T-Shirts,” “Mugs.” | Form the backbone of your main menu. |
| Promotional | Manual or Automated by Tag | Drive sales for specific campaigns. Example: “Summer Sale,” “Gift Guide Under $50.” | Feature prominently on homepage; use compelling imagery. |
| Behavioral | Automated by Shopify Logic | Respond to user intent. Example: “Recently Viewed,” “Trending This Week.” | Place in product page sidebars or footer to increase engagement. |
| Seasonal/Holiday | Automated with Publish Dates | Capitalize on time-sensitive demand. Example: “Back to School,” “Holiday Decor.” | Schedule to publish/unpublish automatically. |
Pro Tip: For automated collections, use a consistent tagging system from day one (e.g., category-tops, color-blue, season-summer). This makes creating and maintaining smart collections effortless.
Step 9: Digital Products & Services Setup
Shopify excels with physical goods, but its app ecosystem makes it formidable for digital products, services, and subscriptions.
- Digital Downloads (E-books, Software, Music): Use apps like Digital Downloads or SendOwl. Key setup: enable instant delivery post-purchase, offer multiple file formats, and use license keys for software.
- Services (Consulting, Coaching, Classes): Use a booking app like BookThatApp or Appointo. Configure your service types, durations, availability, and integrate with a calendar (Google/Outlook).
- Subscriptions (Boxes, Memberships): Use ReCharge or Subscriptions by Shopify. Clearly communicate billing cycles, offer multiple tiers, and ensure your fulfillment process is airtight.
The Critical Differentiator: For non-physical offerings, your product description and post-purchase communication are even more vital. You’re selling an outcome or an experience—make it tangible through detailed explanations, sample videos, and stellar onboarding.
Chapter 5: Phase 4 – Pre-Launch Essentials: The Final Countdown
Step 10: Page Creation – Building Trust and Authority
Your standalone pages are where you establish credibility, provide essential information, and forge a human connection. They answer the critical questions every visitor has.
A. The About Page: Your Brand’s Storytelling Hub
This is not a corporate history. It’s a connection point. Include:
- Founder’s Story: Why did you start this? Be authentic.
- Mission & Values: What do you stand for beyond profit?
- Visual Proof: Team photos, behind-the-scenes videos, your workspace.
- Social Proof: Press mentions or customer love, if available.
B. The Contact Page: Accessibility = Trust
Make it easy. Include:
- A Contact Form (Shopify has a built-in block).
- Email Address (e.g., [email protected]).
- Expected Response Time (e.g., “We reply within 24 hours”).
- FAQ Link: Direct simple questions there first.
- Social Media Links: For less formal contact.
C. Policy Pages: Your Legal Shield & Trust Signal
These are non-negotiable for compliance and reducing customer hesitation. Generate templates via Settings > Policies, then customize them thoroughly.
Essential Policy Pages:
- Privacy Policy: Explains how you collect, use, and protect customer data (GDPR/CCPA required).
- Terms of Service (ToS): The rules for using your website and purchasing.
- Refund/Return Policy: Be clear and fair. A lenient policy can increase conversion. State timeframes, condition requirements, and who pays for return shipping.
- Shipping Policy: Detail processing times, shipping methods/costs, and international restrictions.
D. FAQ Page: Your Scalable Customer Service Agent
A well-structured FAQ reduces support tickets by up to 50%. Organize by topic (Shipping, Products, Orders, Company). Use an accordion format for easy scanning. Answer questions you’re actually getting or anticipate.
Step 11: Navigation & Menu Architecture – Designing the Map
Your site’s navigation is the map that determines whether visitors find treasure or abandon ship. Conduct a “three-click test” yourself: can you find a specific product from the homepage in three clicks or less?
Information Architecture Best Practices:
- Desktop: Use clear, broad category names. Employ mega menus for complex stores to display multiple subcategories at once.
- Mobile: Use a hamburger menu. Implement a sticky bottom bar with Home, Search, Cart, and Menu icons for thumb access.
- Footer Navigation: Repeat key links here for easy access after scrolling.
Step 12: Domain & Email Professionalism – Your Digital Real Estate
“Your brand is what other people say about you when you’re not in the room.” – Jeff Bezos. Your domain and email are foundational to that brand.
Choosing a Domain:
- .com is King: It’s still the most trusted and memorable TLD.
- Keep it Short & Brandable: Avoid hyphens and numbers. Make it easy to spell and say aloud.
- Check Social Handles: Ensure the name is available on key social platforms before buying.
Professional Email:
- Never use Gmail/Yahoo: Create
[email protected]addresses via your domain registrar or Google Workspace. - Set Up Key Addresses:
hello@,support@,orders@. - Configure SPF/DKIM/DMARC Records: This technical step is crucial to prevent your order confirmation and marketing emails from being marked as spam.
Step 13: SEO Foundation – The 2026 Technical Blueprint
Search Engine Optimization begins before launch. Google’s algorithms in 2026 prioritize page experience and topic authority.
Pre-Launch SEO Checklist:
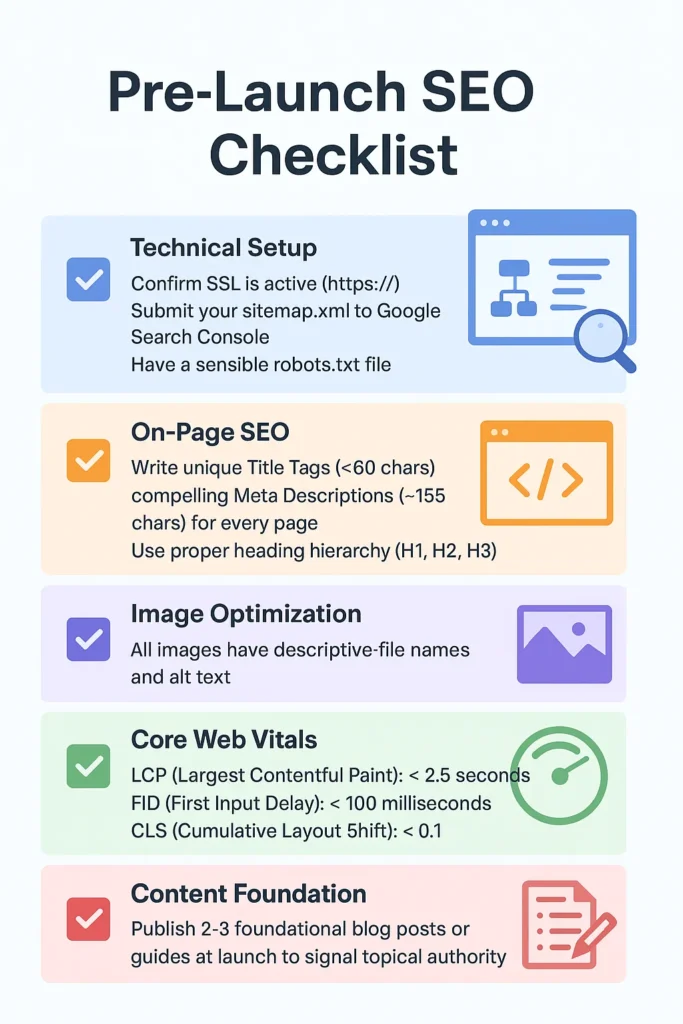
- [ ] Technical Setup: Confirm SSL is active (
https://), submit yoursitemap.xmlto Google Search Console, and have a sensiblerobots.txtfile. - [ ] On-Page SEO: Write unique Title Tags (<60 chars) and compelling Meta Descriptions (~155 chars) for every page. Use proper heading hierarchy (H1, H2, H3).
- [ ] Image Optimization: All images have descriptive file names and alt text.
- [ ] Core Web Vitals: Use Google PageSpeed Insights. Target:
- LCP (Largest Contentful Paint): < 2.5 seconds
- FID (First Input Delay): < 100 milliseconds
- CLS (Cumulative Layout Shift): < 0.1
- [ ] Content Foundation: Publish 2-3 foundational blog posts or guides at launch to signal topical authority.
Step 14: Analytics & Tracking Implementation – Measuring to Improve
“You can’t manage what you don’t measure.” – Peter Drucker. Implement these before your first visitor.
Essential 2026 Tracking Stack:
- Google Analytics 4 (GA4): The new standard. Set up with Enhanced E-commerce tracking to see the full customer journey. Link to Google Search Console.
- Facebook/Meta Pixel: Essential for building retargeting audiences and optimizing ads. Track
ViewContent,AddToCart,Purchaseevents. - Shopify’s Native Analytics: Your go-to for daily operational metrics like sales, traffic, and top products.
- A Heatmap Tool (e.g., Hotjar, Microsoft Clarity): Provides qualitative insight through session recordings and click maps, showing you how people use your site.
Chapter 6: Launch & Immediate Post-Launch Actions
The Launch Sequence: Flipping the Switch Strategically
Launch day is a sequence, not a single event.
- Remove Password: In Online Store > Preferences, disable password protection.
- Final Domain Check: In Settings > Domains, confirm your custom domain is primary.
- Live Purchase Test: Make a real purchase using a payment method. Test the entire flow.
- Search Engine Submission: In Google Search Console, submit your sitemap and request indexing of key pages.
- The Announcement: Send your launch email, post on social media, and tell your network.
- Vigilant Monitoring: Watch analytics and be ready to respond to the first orders and inquiries personally.
The First 48 Hours: Learning from Live Data
Monitor these key metrics closely, but don’t panic. Early numbers establish a baseline.
Table 6.1: First 48-Hour Metric Benchmarks & Insights
| Metric | Realistic Early Benchmark | What It Tells You | Action if Low |
|---|---|---|---|
| Conversion Rate | 1.0% – 2.5% | Overall store effectiveness. | Check site speed, trust signals, and price competitiveness. |
| Add-to-Cart Rate | 8% – 15% | Product/page appeal and pricing. | Optimize product images, descriptions, and clear calls-to-action. |
| Cart Abandonment Rate | 60% – 75% (Industry Avg: ~70%) | Checkout process friction. | Ensure abandoned cart emails are on; simplify checkout; add more payment options. |
| Average Session Duration | 1.5 – 3 minutes | Content engagement and site stickiness. | Improve product page content and internal linking (collections, related products). |
| Mobile vs. Desktop Conversion | Mobile typically 50% of desktop rate. | Mobile UX effectiveness. | Aggressively optimize for mobile speed and checkout simplicity. |
Initial Marketing Implementation: Priming the Pump
- Email Your List: Start a welcome series that tells your story and highlights products.
- Social Proof Gathering: Politely ask your first customers for reviews. Offer a small future discount as thank you.
- Controlled Ad Spend: Run a small test campaign ($5-10/day) on Facebook/Instagram targeting interest-based audiences to gauge product-market fit.
- Content Launch: Share the “story behind the launch” in a blog post or social video.
Conclusion: From Blueprint to Legacy—Your Journey Begins Now
The path you have just meticulously walked through represents far more than a technical manual; it is a philosophical blueprint for building a resilient, customer-obsessed business in the digital age. The process of setting up a Shopify store in 2026, with its layers of integrated intelligence and democratized tools, signifies a profound shift in commerce. The formidable barriers that once demanded significant capital or deep technical expertise have been systematically dismantled, but in their place, a new standard has emerged—one where trust, clarity, and strategic execution are the true currencies of success.
The initial overwhelm you may have felt is not a warning sign to turn back, but a compass pointing you toward something of substance. Every iconic brand that now seems like an overnight sensation—from the direct-to-consumer pioneers who reshaped retail to the niche artisans building global communities—began precisely where you stand. They faced the same administrative labyrinths, wrestled with similar strategic crossroads, and discovered that mastery is not a prerequisite for starting, but the reward for persistent, informed action.
As you transition from the structured world of setup to the dynamic arena of daily operation, carry forward the core methodology of this guide: confront complexity with sequenced phases, allow empirical data to refine your intuition, and never, ever lose sight of the human being on the other side of the screen. Your store is a living entity. The products will evolve, the design will refresh, and your marketing will become more sophisticated, but the robust foundation you pour today—the compliant settings, the intuitive navigation, the blisteringly fast pages—will steadfastly support every future iteration of your growing vision.
Launching your store is not a finale; it is the most promising prologue. It is the moment your private conviction becomes a public proposition. The market does not wait for perfection—it responds to genuine value, compelling stories, and solved problems. You have built the vessel. Now, set sail. Begin, learn with each interaction, adapt with insight, and build something that not only sells but resonates. Your entrepreneurial legacy starts not with a grand vision alone, but with the decisive click of “Publish.” That moment is now.